So new codex means new list. Having read through the new book I get the feeling that the best way to go is to try and maximize fire output and high durability.
For 1750 points:
1x Overlord
- Phaeron
- Warscythe
- Phase shifter
1x Royal Court
-Lord
- Warscythe
- Resurrection orb
- Cryptek
- Harbinger of Transmogrification
- Harp of Dissonance
- Cryptek
- Harbinger of Transmogrification
- Seismic Crucible
20x Necron Warriors
9x Necron Warriors
-Ghost Ark
9x Necron Warriors
-Ghost Ark
3x Wraiths
3x Wraiths
1x Triarch Stalker
1x Triarch Stalker
1x Annihilation Barge
1x Annihilation Barge
Total:1739
I might try to fit in some mind shackle scarabs on the overlord if i can decide where to drop 4 points.
How I think it works:
Overlord and regular lord deploy with the big warrior squad which advances down the field towards the objectives/enemy. This unit should be very hard to damage with the resurrection orb. Hopefully it will also stand up to some punishment in combat outputting 5 s7 power weapon attacks when it is being charged. The relentless gained from the overlord means it will continue to output a nice chunk of firepower on the move.
Everything else floats along behind this unit.
The Praetorian are my counter attack unit to prevent the big warrior unit from being bogged down in combat. Alternatively being able to jump out from behind and put in a few low AP shots is nice.
The Ghost Arks protect the two smaller warrior units (which the crypteks are hiding in) and reanimate into the big unit. I decided to spit the cryptek wargear so I could use it on different targets and hopefully slow down the enemy and give me an extra turn of shooting against unwanted assaults.
If nesessary the stalkers can tie up enemy units in combat, however their main purpose is to provide the rerolls to hit for the other units...4 melta shots never went amiss either.
I decided to use the annihilation barges (credit for the idea to Jason) for extra firepower that is resilient and relatively cheap that can keep up with the rest of the army. Originally I had a single Doomsday Ark but its shooting on the move is rather disappointing
edit:
after some thought and discussion I swapped the Praetorians for 6 wraiths. The main rold this unit fills is counter assault. with double the attacks and more than double the wounds and a 3++ invun) and fearless I think the wraiths will better serve in this role. Having crunched some numbers the wraiths will cause more kills on opponents, up to and including power armor marine equivalent.
For example against power armor marine equivalent:
Praetorians: 3.333 kills on the charge
Wraiths: 4.667 kills on the charge
this obviously only gets better against less durable enemies where the volume of attacks puts the wraiths at an advantage. As a bonus I could use them to opportunistically take a swipe at vehicles
Thoughts/comments?

Tactics, modeling and painting for tabletop wargaming.
Saturday, November 5, 2011
Sunday, October 30, 2011
Consolidated procrastination/experimentation
So in a study induced fit of insanity I decided to throw the green washed Necron into the ultrasonic cleaner because I wasn't happy with the application of the wash (I wanted to try to paint it only into the recesses). The result was that 90% of the green wash was removed, striping the model back to either the clear kote or the polished aluminium (you really cant tell when the coat is dry if its there or not. There are two spots, one on the gun and the other on the shoulder where the metallic came off a bit too leaving the plastic exposed. The part on the gun I believe to be the result of missing that part with the clear kote, on the shoulder I think a scratch was at fault. I am not concerned about this as ill be painting over those bits in acrylic matte colours later.
Here is the striped model with a Black wash, using a wash brush to stop the black from pooling on any raised flat surfaces. Notice also that the sand on the base was annihilated.


 Some little bits of green had remained. On experimenting on another model (a hapless space marine) I found that two rounds in the ultrasonic and then a little toothbrush action removed all of the wash over the Alclad.
For some comparison shots of the various experiments.
Here is the striped model with a Black wash, using a wash brush to stop the black from pooling on any raised flat surfaces. Notice also that the sand on the base was annihilated.


For some comparison shots of the various experiments.
 |
| No wash |
 |
| No wash, different angle and light |
 |
| Thraka green wash front view |
 |
| Thraka green wash back (with pools on the shoulders and blade) |
|
| Badab Black wash with bits of green still visible in joints. No pooling |
Saturday, October 29, 2011
More procrastination
I gave the warrior a controlled wash of thraka green. It tinged and shaded the metal. Still undecided.


This is a random marine that I tested the dark aluminum with a controlled black wash.
Overall I am happy but I think I might paint the wash into the recesses only on the next experiment.


This is a random marine that I tested the dark aluminum with a controlled black wash.
Overall I am happy but I think I might paint the wash into the recesses only on the next experiment.
Polished aluminum Necron procrastination
I present the following accomplishments achieved during my study breaks over the last 2 days

 Base coat Alclad2 Gloss black
2x light coats of Polished aluminum
1x coat of Alclad cleat kote (despite recommendations to use it on matte paints).
note: the blue reflection is my computer screen a few meters away
Next step is to try experimenting with Glaze Medium used to thin boltgun metal as per http://www.youtube.com/watch?v=LUyJDFZzyrQ&feature=youtu.be
Tuesday, October 25, 2011
Paint it gold
As a way of procrastinating I decided to try out the bottle of Alclad II pale gold. Over the weekend I consolidated and organised my hobby mess. Amongst my various works in progress was a fully build and prepared Necron C'Tan Deciever.
Since the model is metal I decided to give it an undercoat with citadel chaos black to prime the model before applying a layer of Alclad gloss black. I have no clue if the primer was nesessary first. On my experimentation list is to see how well the Alclad gloss black or black primer stick to metal.
 I left that in a cardboard box to dry overnight. Protecting the model from dust for a few hours is important because the gloss black is sticky for a while after spraying and the Alclad metallic paints show up any imperfections in the surface.
Next step was a light and even coat of Pale Gold following the instructions on the side of the bottle.
Here are a few pictures with different light source/angles.


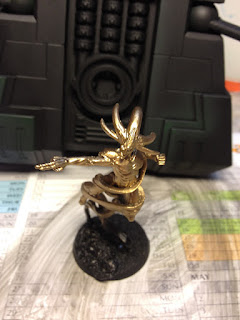
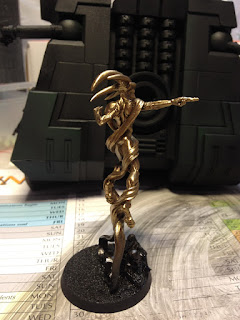
 The pictures don't really do it justice. Effectively one quick coat of the gold leaves an amazingly solid gold which really catches the light. It looks like gold from across the room. The next step will be to paint the cloth and details using acrylics. Then Ill seal the model with some varnish and will try out oil washes to further accentuate the gold.
Since the model is metal I decided to give it an undercoat with citadel chaos black to prime the model before applying a layer of Alclad gloss black. I have no clue if the primer was nesessary first. On my experimentation list is to see how well the Alclad gloss black or black primer stick to metal.

Next step was a light and even coat of Pale Gold following the instructions on the side of the bottle.
Here are a few pictures with different light source/angles.


Monday, October 24, 2011
October Hobby Summary
Due to various issues (aka life) October has and will probably continue to be my hobby low point for this year :(
Luckily my exam schedule means that I will be free in time for the GW November release. The following video makes my spine tingle. November Teaser this really re-inspired me about potential new background material and was a nice break from the internets overwhelmingly negative droning. In preparation I have demoldlined ~40 Necron warriors. The pieces are currently in individual zip lock bags in case I can integrate some new parts with them soon. Otherwise they will very quickly go together as is.
I got around to fixing the air leak in my airbrush setup. Using my ear and then a sprayer bottle of water I found that my pressure regulator/moisture trap was leaking through all 3 connectors.
 Those parts where you can currently see blue used to use white Teflon (plumbers) tape. One of the problems I noticed when disassembling this configuration was that the white tape was being torn on the tops of the thread when the connectors were fastened.
 The solution was some $2 Fix-A-Tap that I picked up from bunnings. (previously I was using $1 generic Teflon tape from supercheap auto).
This seems to have worked perfectly. I tightened everything back up and ran my compressor to fill its tank...1 hour later there is no significant drop in pressure. Prior to this the compressor would have had to kick in ever 10 minutes or so to top the pressure back up.
Otherwise I have been looking forward to playing with the Alclad metalics again. I undercoated my Deciever model and am considering using the Titanium gold.
The Ultramarines returned from their tour of duty almost unscathed. Almost meaning that somehow one of the land raider front doors was pried open which should be an easy fix.
Luckily my exam schedule means that I will be free in time for the GW November release. The following video makes my spine tingle. November Teaser this really re-inspired me about potential new background material and was a nice break from the internets overwhelmingly negative droning. In preparation I have demoldlined ~40 Necron warriors. The pieces are currently in individual zip lock bags in case I can integrate some new parts with them soon. Otherwise they will very quickly go together as is.
I got around to fixing the air leak in my airbrush setup. Using my ear and then a sprayer bottle of water I found that my pressure regulator/moisture trap was leaking through all 3 connectors.


This seems to have worked perfectly. I tightened everything back up and ran my compressor to fill its tank...1 hour later there is no significant drop in pressure. Prior to this the compressor would have had to kick in ever 10 minutes or so to top the pressure back up.
Otherwise I have been looking forward to playing with the Alclad metalics again. I undercoated my Deciever model and am considering using the Titanium gold.
The Ultramarines returned from their tour of duty almost unscathed. Almost meaning that somehow one of the land raider front doors was pried open which should be an easy fix.
Sunday, October 16, 2011
Rumour overload
Really exciting time. Been trying to follow the rumourfest since it first broke. Trying to refrain from judgment either way.
The main thing keeping me happy is thinking about how cool the Grey Knight codex is and that the same people were equally negative about that.
The main thing keeping me happy is thinking about how cool the Grey Knight codex is and that the same people were equally negative about that.
Monday, October 10, 2011
NMM Grey knight Nemesis Great Sword
So after watching a few tutorials I was excited to have a go at airbrushing the Nemesis Great Sword.
As luck would have it murphy had it in for me last week :(
Three days of rain prevented me from undercoating the sword. To follow that up as soon as I got it undercoated the thread on the nozzle of my airbrush gave out.
Having no local store and a long weekend coming up I placed my order on the Friday and proceeded to distract myself with my Necrons.
On a side note I was disappointed to find out the the superglue holding my Pylon together had become brittle and completely given up on holding the model together...ffortunately It looks like I can just scrape it off and use better glue. All of the pins were successfully recovered which I was happy about as half of them are 2mm steel fencing wire (which is a pain to cut and straighten).
Sooner than I expected on the following Tuesday the replacement part for my airbrush arrived and my Necrons got pushed to the back of my table.
This is the result of my first attempt:

 I'm quite happy with how it turned out. A big thanks to everyone who has posted tutorials on the internet. I have a few ideas for improvment but think Ill come back top this another time.
As luck would have it murphy had it in for me last week :(
Three days of rain prevented me from undercoating the sword. To follow that up as soon as I got it undercoated the thread on the nozzle of my airbrush gave out.
Having no local store and a long weekend coming up I placed my order on the Friday and proceeded to distract myself with my Necrons.
On a side note I was disappointed to find out the the superglue holding my Pylon together had become brittle and completely given up on holding the model together...ffortunately It looks like I can just scrape it off and use better glue. All of the pins were successfully recovered which I was happy about as half of them are 2mm steel fencing wire (which is a pain to cut and straighten).
Sooner than I expected on the following Tuesday the replacement part for my airbrush arrived and my Necrons got pushed to the back of my table.
This is the result of my first attempt:


Sunday, September 25, 2011
Incursion Mission 5 pt 2
Today I played through the second part (Taking control of the lucky 7th) of Incursion against LittleMax. It was a close game but in the end I got overwhelmed by zombies. Zombies are critical for a German win in my humble opinion.
I managed to open the door for the stranded trooper but in the end got dragged down. I used:
The Blazer performed remarkably well in his area denial role, keeping the central corridor open. Unfortunately for him (and by extension me) one of the zombies was a fireman prior to being turned and survived every on fire roll made against him, only succumbing to the flames after killing the Blazer.
My main mistake was letting Ilsa shoot my Grunt in the back. If he had been an extra square back with his back to a wall then I doubt that Ilsa would have spent 4 AP shooting at his back knowing he would be shooting back each time.
In other hobby related news having finished the Ultramarine army muster off I have been doing some freestyle hobby.
I am part of the way through assembling my Grey Knight army and have been playing around with some Pearl-Ex interference pigments (pixy dust). I'm not sure if I will use them on the GK but its definitely a possibility.
I managed to open the door for the stranded trooper but in the end got dragged down. I used:
- Sarge
- Slugger
- Blazer
- 2x grunt (1 stranded)
The Blazer performed remarkably well in his area denial role, keeping the central corridor open. Unfortunately for him (and by extension me) one of the zombies was a fireman prior to being turned and survived every on fire roll made against him, only succumbing to the flames after killing the Blazer.
My main mistake was letting Ilsa shoot my Grunt in the back. If he had been an extra square back with his back to a wall then I doubt that Ilsa would have spent 4 AP shooting at his back knowing he would be shooting back each time.
In other hobby related news having finished the Ultramarine army muster off I have been doing some freestyle hobby.
I am part of the way through assembling my Grey Knight army and have been playing around with some Pearl-Ex interference pigments (pixy dust). I'm not sure if I will use them on the GK but its definitely a possibility.
Tuesday, September 6, 2011
Army Muster Complete

It is complete!!!! Best feeling ever...well a close second at least :P
Finished off the bases this morning and added some transfers to the vehicles to make them look a little bit more complete. I hope they Smash some Chaos on Games Day :)
Note to self: Buy decent camera

Saturday, August 20, 2011
Grey knights

Just a quick post with what I have been working on. Taking a break from the Ultramarines since only the captain and a little bit of work on the landraiders left.
Started preparing fr the assembly of a Grey Knight army. I haven't decided on a list yet. Given my compulsive hatred of mold lines on finished models I have been clipping the bits out and scraping the mold lines off while sorting them.
I haven't decided if I'm going to bother magnetizing the weapon options or just build extras at this stage.
Thursday, August 4, 2011
Supply Run
I got some more hobby supplies yesterday. Found some disposable respirators at Bunnings that have carbon filters so are probably useful against fumes as well as small particles. The package says they are for agricultural spraying and painting so I feel a lot safer. They are a lot less bulky and a lot more comfortable than a non disposable respirator and are approximately equivalent in cost to replacement cartridges (approx $9 for a pack of two).

Also apparently California knows better. This was what I found on the side of a bottle of plastic glue that I am trying out. I will post notes on its performance but in the meantime I found this warning message to be hilarious.

This is another Deathwatch marine Apothecary Precipice (my first one in fact) that I am still working on. It seems like I never really finish painting a model because there is always something else I want to come back to do.

 Painting black is painful. After being undercoated with chaos black spray I repainted the armor black because it is a different colour and texture to the spray. All the edges and panel lines were highlighted with a mix of Adeptus grey and chaos black. The hard/sharp edges were then highlighted with Astronomican grey.
 This was the first model that I used the airbrush on. The pressure was way too high (max for my compressor @ approx 60 psi) and the paint way too thick (1 part demineralised water one part paint). This meant that the brush kept clogging up every few minutes.
One of the things that I discovered while painting this model was that if you put pure windex through the airbrush at high pressure you can strip off a recent coat of paint. I had originally tired a purple colour scheme which I didn't like and while trying to clean the airbrush accidentally hit the model with some spray. The windex striped the model back down to the chaos black undercoat.
The purple had been dry for approx 20 minutes at this stage. I am unsure if this will work on paint that has been on the model longer but when the opportunity presents it self I intend to try it out.
Did I mention that the fighter is an awesome model. I picked this one out to try the airbrush on first because of its mix of curved and sharp edges. It is really quick to put together, the whole thing is less than a dozen pieces from memory with the main hull consisting of two.

Also apparently California knows better. This was what I found on the side of a bottle of plastic glue that I am trying out. I will post notes on its performance but in the meantime I found this warning message to be hilarious.

This is another Deathwatch marine Apothecary Precipice (my first one in fact) that I am still working on. It seems like I never really finish painting a model because there is always something else I want to come back to do.


One of the things that I discovered while painting this model was that if you put pure windex through the airbrush at high pressure you can strip off a recent coat of paint. I had originally tired a purple colour scheme which I didn't like and while trying to clean the airbrush accidentally hit the model with some spray. The windex striped the model back down to the chaos black undercoat.
The purple had been dry for approx 20 minutes at this stage. I am unsure if this will work on paint that has been on the model longer but when the opportunity presents it self I intend to try it out.
Did I mention that the fighter is an awesome model. I picked this one out to try the airbrush on first because of its mix of curved and sharp edges. It is really quick to put together, the whole thing is less than a dozen pieces from memory with the main hull consisting of two.
Thursday, July 28, 2011
Deathwatch conversions
While looking for some more pictures to post here I came across some pics from some conversions I was working on earlier in June. These guys are a side project that I'm working on when I have had enough of painting blue.
These are intended for use in Deathwatch RP campaign.

This is the Ultramarine Librarian Varen. When I uploaded this guy to facebook it detected his face and wanted me to tag him as a friend. Thats how good the sculpts on the Grey Knight models are.
This batch of conversions is really just a big kit bash (one of the reasons I love working with plastic and am psyched to work with finecast).
I have cannibalized bits from the power armored grey knights box, space marine command squad, sanguinary guard and space marine commander box.
There is a little bit of green stuff work to reposition the sword arm and left wrist. Not as apparent from these pictures but he is looking and pointing with the sword and hand at the same distant target.

I cut the antenna off the interceptor backpack. I have a tube sculpting tool that I will try out on him to connect the top ports on the power pack to the collar of the power armor to give him a super psychic hood.
 The pose is supposed to look like he has just stepped back and taken up a stance to project psychic lightning at the threat
 As of yet unnamed assault marine running towards target while firing plasma pistol and about to leap into the air. Currently held together with bluetack and in need of a shoulder pad. This one uses other bits from the boxes mentioned above.

 My personal favorite a Keeper of the Watch. I need to find a nice axe head for the top of that staff and bend the cape down a bit so its closer to his legs.
For the bases I am going to use the decking from a Fortress of redemption. I love the double tread plate used on the walkways.

These are intended for use in Deathwatch RP campaign.

This is the Ultramarine Librarian Varen. When I uploaded this guy to facebook it detected his face and wanted me to tag him as a friend. Thats how good the sculpts on the Grey Knight models are.
This batch of conversions is really just a big kit bash (one of the reasons I love working with plastic and am psyched to work with finecast).
I have cannibalized bits from the power armored grey knights box, space marine command squad, sanguinary guard and space marine commander box.
There is a little bit of green stuff work to reposition the sword arm and left wrist. Not as apparent from these pictures but he is looking and pointing with the sword and hand at the same distant target.

I cut the antenna off the interceptor backpack. I have a tube sculpting tool that I will try out on him to connect the top ports on the power pack to the collar of the power armor to give him a super psychic hood.


For the bases I am going to use the decking from a Fortress of redemption. I love the double tread plate used on the walkways.

Wednesday, July 27, 2011
Wednesday Hobby Session
 |
| Squad so far |
Im really happy with how the armor turned out. Everything that you read describes Ultramarines as being a cobalt colour.
The armor is done by the following steps:
- Chaos Black Spray undercoat
- Mordian Blue through the spray gun
- Ultramarine Blue drybrush. Very lightly and selectivly targeting the sharp edges and areas of the model where I expect more light (top curve of shoes and kneecaps)
- 50/50 Azureman Blue/Badab Black wash
- Edge highlight with 2:1 skull white/mordian blue (I cant promise its not 3:1, that is why I keep a painting journal with my gear. I have it written down and will check and update if necessary).
 |
| Rear of Sargent |
 |
| Sargent |

Being the grim dark future I usually prefer to stick with darker colour schemes. Also as mentioned the Ultramarines are described as being a cobalt colour.
This means that ultramarine blue (or the mordian/skull white mix that I prefer) is the final highlight since I am not using extreme highlighting on these guys. This is a general principle I use for painting 40k; If you want something be be colour x then colour x is the highlight.
The marines that I have painted so far do look darker in person than the pictures above. When I get around to taking up model photography I will do some research on proper colour balance etc.
I have been thinking about replacing my phone recently (current phone: iPhone 3g) and the ability of the phones camera to take good pics of minis is a serious consideration. Just to creep out some mobile phone dealers I'm thinking of taking some models and rulers and a lamp into a phone shop and hamming it up with a photo-shoot (ruler runway etc :P)

On a side note I have also been seriously considering getting a Harder Steenbeck Infinity 2 in 1 Airbrush for finer detail work. I have heard amazing things about this airbrush. To quote Scotttard "Its red...red is betta cause red goes faster!!!"
Seriously though it looks sweet.
One of the things that I completely forgot about for the terminators is that the helmets are supposed to be white. Next time I sit down and work on them I will have to fix that up.
To finish them off I need to:
- Fix helmets, paint sarg's head
- Drill and blacken barrels on the guns (i forgot to earlier)
- Gem effect the targeters
- Add a bit to the eyes
- Highlight the white/grey bits
- Highlight the metal
- Do the base

Monday, July 25, 2011
Getting started with Airbrushing
As promised here is my post on my experience starting out airbrushing.
After doing my research I figured out that I wanted the following configuration:
-Gravity fed dual action airbrush
-Compressor with air tank
I ended up investing a bit and purchased an Iwata HP-CH. Not that I have much by way of other airbrushes to compare it to, I am very impressed with the quality of construction. The thing looks and feels like it could last forever.
By way of compressor I cheeped out and purchased a no name one off ebay that met my criteria. I really regret this decision. It does the job perfectly...except the pressure regulator is rubbish. The problem is the pressure regulator is pretty much either full on or full off with no ability to select intermediate pressures. The net result is that i had to purchase an additional regulator and an extra hose and introduced a leak into the system.
On leaks the bigger 1/4" BSP fittings seem to leak air a lot more than the r 1/8" BSP fittings so where possible i would recommend buying equipment that uses the smaller fittings. I picked up some Teflon (plumbers) tape from super cheap auto for $1 and that has reduced the air leaks very substantially but I haven't eliminated them totally yet. I'm going to grab a water gun and spray down all the connections till i find the bubbles then use some more tape and maybe some duct-tape or hot glue to try and plug the last few gaps.
Another thing I got at the same time was an ultrasonic jewelry cleaner ($50 off ebay again...look at the wattage and frequency) off the recommendation of a few blogs. This is amazing for cleaning out the airbrush parts (never ever soak the whole thing according to everything I have read) and I have also used to clean paint out of the runnel of my paint brushes as well as help strip paint from metal models. I fill it with regular windex and run it for a few three minute cycles and that seems to annihilate paint.
Windex is your friend. I have been through a few bottles of both the original windex glass (the blue one...don't get the ammonium free variety) and the clear windex surface and glass. I have noticed no appreciable difference between the two.
As far as the rest of set up goes, the following are necessary IMHO:
Some other incredibly useful things are:
As you can see there is a bit of a theme of requiring a lot of cleaning products. You need to keep the airbrush clean, its possible that I am overdoing it but I would rather clean too often than not enough. In a future post I will go through some of the cleaning procedures since there are a few nifty tricks that I have picked up. Also I didnt mention It above buy I purchased a large bottle of filtered demineralised water (also from super cheap auto) and use that instead of tap water.
Once I have a working camera I will also post some pictures of my set up. In a future post I will go in depth on what I have learnt about paints and pressures.
Feel free to post any questions and I'll do my best to answer them.
After doing my research I figured out that I wanted the following configuration:
-Gravity fed dual action airbrush
-Compressor with air tank
I ended up investing a bit and purchased an Iwata HP-CH. Not that I have much by way of other airbrushes to compare it to, I am very impressed with the quality of construction. The thing looks and feels like it could last forever.
 |
| Iwata HP-CH |
By way of compressor I cheeped out and purchased a no name one off ebay that met my criteria. I really regret this decision. It does the job perfectly...except the pressure regulator is rubbish. The problem is the pressure regulator is pretty much either full on or full off with no ability to select intermediate pressures. The net result is that i had to purchase an additional regulator and an extra hose and introduced a leak into the system.
On leaks the bigger 1/4" BSP fittings seem to leak air a lot more than the r 1/8" BSP fittings so where possible i would recommend buying equipment that uses the smaller fittings. I picked up some Teflon (plumbers) tape from super cheap auto for $1 and that has reduced the air leaks very substantially but I haven't eliminated them totally yet. I'm going to grab a water gun and spray down all the connections till i find the bubbles then use some more tape and maybe some duct-tape or hot glue to try and plug the last few gaps.
Another thing I got at the same time was an ultrasonic jewelry cleaner ($50 off ebay again...look at the wattage and frequency) off the recommendation of a few blogs. This is amazing for cleaning out the airbrush parts (never ever soak the whole thing according to everything I have read) and I have also used to clean paint out of the runnel of my paint brushes as well as help strip paint from metal models. I fill it with regular windex and run it for a few three minute cycles and that seems to annihilate paint.
Windex is your friend. I have been through a few bottles of both the original windex glass (the blue one...don't get the ammonium free variety) and the clear windex surface and glass. I have noticed no appreciable difference between the two.
As far as the rest of set up goes, the following are necessary IMHO:
 |
| Table-Top Cleaning Station |
- Respirator (protect your lungs, I hear you need them for something important)
- Cleaning cloth (to wipe down the brush without leaving particles on it and dry off parts after cleaning)
- Cotton swabs (cleaning out the airbrush cup and needle cap)
- Toothpicks (dislodging dried paint at the bottom of the paint cup, mixing paint in the cup, mounting parts to spray on)
- Moist towlet (clean external body of brush, wipe needle when disassembling)
- Sponge (to absorb fluids used when cleaning airbrush)
- Airbrush Cleaning station (somewhere for the thinner, cleaning liquid to go when cleaning out the brush by spraying through cleaner)
- Airbrush cleaner (use for the same brand as the paint your using or just use windex)
- Airbrush cleaning brush (for cleaning out the bits that dont disassemble)
- Moisture trap (removes water and oil from the compressed air before it gets to the brush)
- Airbrush Lubricant (keep the parts working properly. Also coat the needle to prevent paint build up
 | |
| Left to right: Needle cap, Nozzle cap, Nozzle, airbrush body |
- Dropper bottles (for storing paints and cleaning fluids in)
- Disposable pipettes (for mixing paints. Try and get ones with measuring markings so you can measure out ratios)
- Quick Disconnect (allows you to disconnect the airbrush from the hose without having to unscrew it)
- Disposable gloves (keep your hands clean from paint and the oils on your fingers away from what you are painting)
- Foam (to stick the other end of the toothpicks in when your using them to hold parts)
- Masking tape (to protect areas you dont want covered. Dont cheap out, get the decent stuff from an arts supply store because it comes off without taking your paint with it or leaving a residue)
- Black/White cardboard (testing paint consistency on)
- Drop-sheet (protect your work area from over-spray or spills)
- Tupperware containers or small storage containers (keep everything organized. Also put models inside when drying/in between coats so that dust doesn't settle on them)
- Proper lighting
- Notebook (write down everything you try, every ratio you mix and every pressure you spray at and the results)
- Marking pen (label bottles etc)
 |
| Quick Disconnect |
Once I have a working camera I will also post some pictures of my set up. In a future post I will go in depth on what I have learnt about paints and pressures.
Feel free to post any questions and I'll do my best to answer them.
Subscribe to:
Posts (Atom)